
-
TnT Communications
Introduction
WinPATS™ has the ability to upload and download records from the TnT® G4-Series Memory unit.
You must have a TnT® G4-Series that capable of uploading/downloading records to begin with. This is normally defined as a TnT® G4-Series M model. If not then this page doesn't apply to you.
Before attempting to use the download/upload feature, ensure the TnT® G4-Series M is connected to the PC and is switched on. Please make sure the TnT® G4-Series is on the enter barcode screen or the Main menu A screen. If it's not the TnT® G4-Series won't communicate with the PC.
Please ensure the communications are setup correctly before attempting to download/upload records. Refer to the Configuring the Appliance Tester section for more information.To access the download/upload feature of, select Download > TnT Communication from the tool bar.
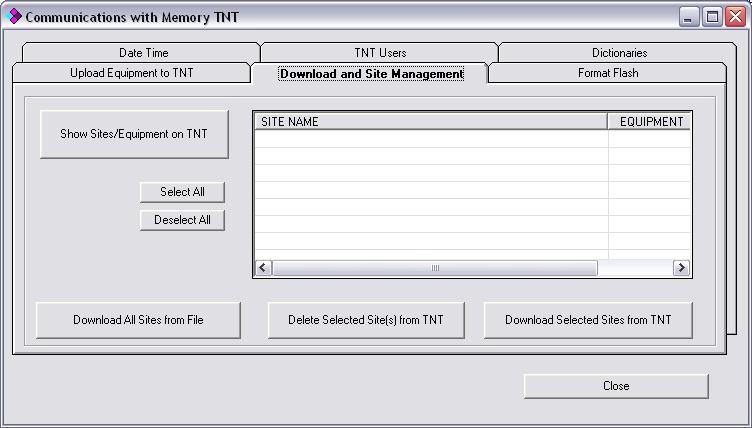
TnT Memory Communications ScreenSetting the Date and Time
Please make sure that the date / time is set correctly before beginning testing. If it is not set correctly then tests result will be incorrect too.
- Select date and time from the communications with memory TnT window.
- From here the date and time on the TnT can be set to match the current PC date and time. This will also provide a connectivity test to ensure that the TnT is connected properly. Click Get TNT Date and Time. If the TnT is connected properly, the current date and time that the TnT holds will be displayed in the box next to the the Get TNT Date and Time button. If the date and time on the TnT is incorrect, click Adjust
- When this has finished, click Get TNT Date and Time again to ensure that it been uploaded successfully.
Downloading Records
- Click the Show Sites/Equipment on TnT button. This will retrieve the sites from the TnT and display them in the window.
- Once the sites have been retrieved, they can be individually selected by clicking the site, or all sites can be selected at once by clicking the Select All button. If a site is no longer needed, it can be deleted by selecting the site and clicking the Delete Selected Site(s) from TNT button.
- When the sites to be downloaded have been selected, click the Download Selected Sites f TNT button. This will begin the download process which can be seen in the status window.
- When the download process has finished the merge function will begin. This will update the database with the downloaded data.
Uploading Records
Uploading records transfers the equipment to the TnT® G4-Series appliance tester. All records displayed on the equipment inventory will be transferred to the TnT tester. You can change what is sent by applying a filter to the equipment inventory. To learn more about filters click here.
For each piece of equipment in the equipment inventory the following fields are sent:
Barcode, site, location, description, make, model, serial number, asset number, test frequency and test category. No previous test results are sent from WinPATS™. If the fields are blank then no data is sent. The minimum fields required are barcode, site, location and description (This is a minimum requirement for the WinPATS™ database).
Upload Procedure:
- Click the Upload Equipment to TnT tab
- Click the Check space available on TNT button, this will show how many items and sites are currently on the TnT
- Choose what type of upload method is required (if applicable), see below.
- Click the Prepare data for Upload to TNT button, this will display how many items there are in the database that is currently open
- Click the Upload to TNT button, this will upload the records in the database to the TnT
Warning. Do not use the upload function more than once for the same site or if the site already exists on the TnT® G4-Series tester. This will create duplicate records on each barcode number. To correctly synchronize WinPATS™ database with your TnT® G4-Series tester do the following:
- Click on the download & site management tab and click show sites / equipment on TnT.
- Determine if the site that you want to upload already exist on the TnT tester.
- Determine if there are test results on the TnT tester (equipment that has been tested in a previous time). If there are no test records then skip the next step.
- If the test result data is newer on the tester (equipment that have been tested and the test records have not been transferred back to the computer) then you will need to download the site first. This is important because if it's not done then test results will be lost in step 6. Follow the download procedure in downloading records.
- Click the Show Sites/Equipment on TNT button from download and site management tab.
- Tick the site you are working with and click the delete site button. Click yes to confirm.
- Upload the site you need.
Upload method
In recent version of WinPATS™ there are 3 options for uploading. These are:- Include equipment from all sites - This will upload all the equipment from the database. Don't select this if you have more than 5000 equipment in your database or any pre-existing data on the tester.
- Include equipment from sites not present on TnT - This feature will only upload the sites that are not on the tester. This will Prevent double ups on the TnT.
- Include equipment from main screen only (default) - It is recommend that this option is used. This will only upload what is displayed in the equipment inventory. If you need to apply a filter when uploading then this option needs to be selected. To learn more about how filters effect the upload process see filters page.
Users on TnT
Users can be added or removed from the TnT itself or from WinPATS. Its important to set users names before testing. This keeps track of who did the testing for the records.
- Click the TNT Users tab
- Click the Show Users on TnT button, this will bring up a list of the users currently stored on the TnT. You can add more users or delete current users by entering deleting the names in the boxes
- When the necessary changes have been done, click Update TnT Users to update the users on the TnT.
Dictionaries
Dictionaries allow the predictive text mode to be used on the TnT. Dictionaries are most useful when using the mini keypad. If the test and print kit contains a full size keyboard then you may want to skip the dictionaries section. Dictionary is basically a text file with words in them. When a dictionary is uploaded to the TnT, words can be entered using the predictive text mode, Eg: Wavecom is the word to be entered so 9,2,8,3,2,6,6 is pressed. This method provides faster input compared to alpha mode. Dictionaries can be created from scratch or from words in the database that is currently open. To create a dictionary from scratch, open a notepad file and enter in words that you want to be in the dictionary. Only one word can be on each line.
- Click the Dictionaries tab
- A different different dictionary for each section (Location, Description, Make, Model and Comments) can be uploaded. Click on the section that you wish to upload a dictionary to.
- There is the option of uploading a dictionary from the database that is currently open, from a text file, or from both. Select where you want to upload the dictionary from by clicking the check box next to from database data and From text file. If a dictionary is to be uploaded from a text file, click the button with 3 dots to locate the file. Once a dictionary source has been specified, click the Generate Dictionary button. This will upload the dictionary to the to the TnT
Flash Format
The Format Flash feature allows the records on the TnT M to be deleted. There are two methods in which this can be done: Erase Flash Full and Reset Site Index. Erase Flash Full will delete all records and dictionaries from the TnT M, whereas Reset Site Index will delete records only.
- Go Download > TnT Communications and click the Format Flash tab
- Click the Erase Flash Full or Reset Site Index button, depending on which type of format you want to do. A warning box will appear stating what will happen, click Yes to format.
Note: When accidental deletion occurs, data cannot be recovered if the Erase flash full is used. It is recommended that the reset site index is used for all memory management.
TnT Communications